*****************************
*****************************
There is no right or wrong way to create any of our In The Hoop Shabby Sweet designs but, we thought we'd share a few fun and helpful tips that we have discovered.
Technique 1- Raw Edge:
Cut your fabric strip using pinking shears. 10" long and 1" wide for the 5x7 designs.
You will want to cut the strips closer to 7/8" wide for the 4x4 designs and 1 1/4" wide for the 6x10 designs.
*all fabric strips will be the same length, prior to ruching - 10" long, for all design sizes.
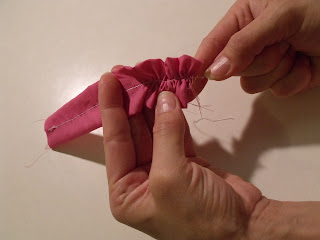
Sew a long loose basting strip up the center of your strip. You will want to use matching thread for this step.
There will be two threads at each end. Separate the two threads and gently pull one of them to bunch your fabric strip.
Technique 2- tri-fold:
Cut your fabric strip 10" long and 4" wide for the 5x7 designs.
You will want to cut the strips closer to 3 1/2" wide for the 4x4 designs and 4 1/2" wide for the 6x10 designs.
*all fabric strips will be the same length, prior to ruching - 10" long, for all design sizes.
If you are using Chiffon, you can seal one edge using a lighter. If you are using cotton or any other fabric that frays, you will need to use fray check.
Fold your strip in thirds length wise, folding the unsealed side in first
Sew a long loose basting strip down the center of your strip. You will want to use matching thread for this step.
There will be two threads at each end. Separate the two threads and gently pull one of them to bunch your fabric strip.
Technique 3- Make a tube:
Cut your fabric strip 10" long and 2 1/2" wide for the 5x7 designs.
You will want to cut the strips closer to 2" wide for the 4x4 designs and 3" wide for the 6x10 designs.
*all fabric strips will be the same length, prior to ruching - 10" long, for all design sizes.
Fold your fabric in half length wise and sew a 1/4" seam down the raw edge to make a tube.
Turn your tube right side out.
Flatten the tube out and place the seam in the center.
Sew a long loose basting strip down the center of your strip. You will want to use matching thread for this step.
There will be two threads at each end. Separate the two threads and gently pull one of them to bunch your fabric strip.
Technique 4- Double Roll hemmed edges:
Cut your fabric strip 10" long and 3" wide for the 5x7 designs.
You will want to cut the strips closer to 2 3/4" wide for the 4x4 designs and 3 1/4" wide for the 6x10 designs.
*all fabric strips will be the same length, prior to ruching - 10" long, for all design sizes.
Stitch a 1/4" seam on each long side of your strip
Repeat this step with a second 1/4" seam on either long side of your fabric strip.
Sew a long loose basting strip up the center of your strip. You will want to use matching thread for this step.
There will be two threads at each end. Separate the two threads and gently pull one of them to bunch your fabric strip.
There are infinite ways to create your ruffled strips for ruching. The main objective is to be creative and have fun. You can use just about any material you would like. Ribbon is another great option.
It's important to know that you do not have to pre ruffle your fabric. It is possible to do all of the ruching in the hoop.
Technique 5- IN THE HOOP RUCHING:
Take your fabric, place the center of the strip directly over your placement stitch and pinch it between your fingers to gather it together. Pin each gather in place using a straight pin. Bunch and pin your fabric repeatedly until it resembles the example picture. Make sure you pin your fabric away from the stitch line so your machine does not have to stitch over your pins. Place a piece of Glad Press and Seal over your gathered strip before you allow your machine to secure it in place with the stay stitches.
HELPFUL TIPS TO FOLLOW WHEN SECURING YOUR RUCHING TO YOUR APPLIQUE IN THE HOOP:
Once you have pinned your ruffle in place along the placement stitch, you will want to use a piece of Glad Press and Seal to cover the ruffled fabric. This will prevent your presser foot from snagging on your ruching as the design secures it in place.
After each piece of ruching is in place you will want to secure it out of the way so it will not be in the way of the next ruched piece as it stitches in place. Usually a piece of Press and seal is strong enough to hold it to the side but, sometimes a straight pin or two are necessary.
Nearly all of our designs will stitch the placement stitches individually and then a triple pass to secure each one immediately following. However, a few of them will stitch out all of the placement stitches at once, such as our Shabby Sweet Ruched Christmas Tree Design.
A Fun Application that we have used is to stitch out these designs onto stitch and tear stabilizer. Once you have finished the design, tear it out of the stabilizer and use some fabric glue, such as Fabri-tac to adhere it permanently to your desired item. This is how we achieved this look with our adorable Ruched Christmas Ornament set.
Hand washing and stitching your embellishments in place are always best however, if you are like me...I don't have time for any of that. I machine wash everything. lol
It will hold up longer and probably look better if you hand wash I am sure. I do usually sew my bows on but, I have just glued them before and they wash well. I have an outfit that I glued a bow onto for my first daughter 7 years ago. My 3rd child is now wearing that outfit and it has been washed in the washer and dried in the dryer umpteen times and looks great. Fabritac works wonders. My advice is to do what you think is best.
So, have fun. Get Creative and DON'T FORGET THE PRESS AND SEAL!! :)
****OUR ENTIRE SHABBY SWEET LINE, INCLUDING ALL IN THE HOOP RUCHED DESIGNS ARE BOTH PATENTED AND PROTECTED BY COPYRIGHT LAWS. EMBROITIQUE OWNS THE RIGHTS TO THESE AND ALL ITH RUCHED MACHINE EMBROIDERY DESIGNS. YOU WILL ONLY FIND THESE DESIGNS AVAILABLE FROM EMBROITIQUE.
Jacki & DeLynne
www.embroitique.com